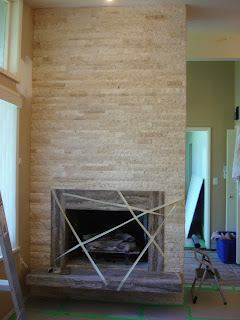
The fireplace in their home was one such item – a man-made, painted ‘brick look’ fireplace that had the added bonus (not) of a tall vertical inset of tiles up the centre of the column.

My first instinct was to simply re-clad all sides of the column in a ledgestone. But we had to go through all the options to ensure the homeowner felt this was the best option.
My client really wanted to drywall over it – think impressive mantle with lovely mirror or artwork above it. But sometimes when you see something you love in a magazine, it doesn’t necessarily mean that you can achieve that same look: you have to think about the ‘bones’ you have to work with.
In their case, this fireplace has a limited width wall, and a ‘floating’ hearth and fireplace opening that are both up off the floor. It wouldn’t look right to add even a floating mantle without either demo’ing the hearth, or building it out down to the floor, and the latter would be very heavy-looking for the width of the fireplace.
(And if you did demo the hearth, the proportions still would not be right in terms of the placement of the fireplace opening.)
Filling in the ‘brick’-work with plaster and painting it, and then simply updating the materials on the hearth and centre vertical inset were also considered. This absolutely would have been an improvement.
In the end we decided, that for the labour and materials still involved in the above option, to go all the way and re-clad the entire column (all 3 sides) in a ledgestone, with a travertine stone to replace what was on the hearth.
I also suggested that they border the fireplace opening with the material used for the hearth, to tie it together and also to attempt to bring down the height of the fireplace. (In this case, a 6” border on either side with an 8” border on the top were perfect – always make the top border a little thicker than the sides; it’s otherwise one of those things that looks ‘wrong’ but you can’t quite put your finger on why.)
The end result is a stunning, rich-looking, updated fireplace that made even the male owner (who had officially declared previously that he didn’t care about style) exclaim “I love it!” when he walked into the house. {The whole house is still in progress, so stay tuned for pictures when it's all done!}


So, remember that while there are technically many things you can do to update a fireplace, you need to take the ‘bones’ of your situation into account to ensure the best end result.
Liz
http://www.elizabethrobertsdesign.ca/
